 |
AUTOCAD SLIDE LIBRARY - SLIDES |

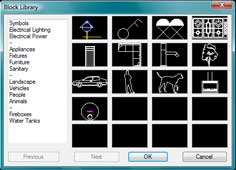
Fig.11
This is one of my favourite items in the menu file. You can make small images of your blocks and put them in a graphic library accessed from the menu. This is great as you can see visually what the block is before you insert it, and it also saves you having to browse for blocks on your hard drive or network.
We need to do 2 things to make a slide library - 1. Add code to menu file & 2. Create the slides we want to see on the menu library.
First we will create some slides. You can use the blocks I have attached for this menu or use your own.
Download blocks here
Open Block 1 - it is of a Car. To make a slide for our library, you want to zoom into the object so it fits on your AutoCAD screen. I usually type "Z" at the command prompt (without quoatations to zoom) then type "E" (without quoatations) for extents. This will center the Car on your screen to the extents all the objects that make up the car in the current space.

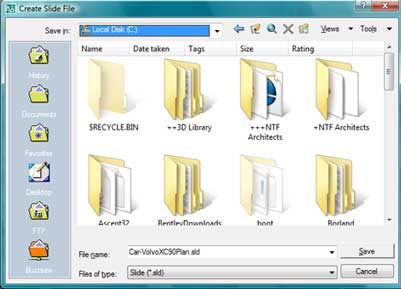
Now to create a slide, type "mslide" at the command prompt (without quoatation marks). You will be prompted to save the slide to a location. Save this file to C: drive for now (Fig.12). You can name this anything you like or just save the slide under the default name. By default, the slide will automatically take the name of the AutoCAD drawing. If all went well, you have saved your first slide.
*NOTE: some useres may experience problems when creating slides if your Windows display settings are set to more than 256 colours. If this happens, temporarily change this setting to 256 colours while creating slides.
Create slides for the other 2 blocks before proceeding to the coding section.
 |
AUTOCAD SLIDE LIBRARY - MENU |
|---|
OK, open up the menu file MyMenu.mnu we have used from previous tutorials. Basically we want to create a sub menu for the image library like we have for the toolbars and helpstrings. So lets declare the library. After the Toolbars section in your menu file, type ***IMAGE. This declares the slide library. On the next line I have written **My_Slides. This line is the name of a section of the slide library to refer to, you can name this anything you like.(Fig.13)
Basically you can create as many sections, or directories as you like. You must prefix every new section (directory) with 2 asterixs **. For example, we could have 3 categories we want to show on our slide library: Cars, Boats, Trucks
So to have these 3 independant sections they all need to have ** before the name to tell AutoCAD this is a new section
. i.e **Cars, **Boats, **Trucks
Don't worry if this is not clear yet, it will make more sense as we progress through this tutorial.

(Fig.13)
Next we are going to give the slide library a name that displays in the titlebar and some titles in the slide menu.

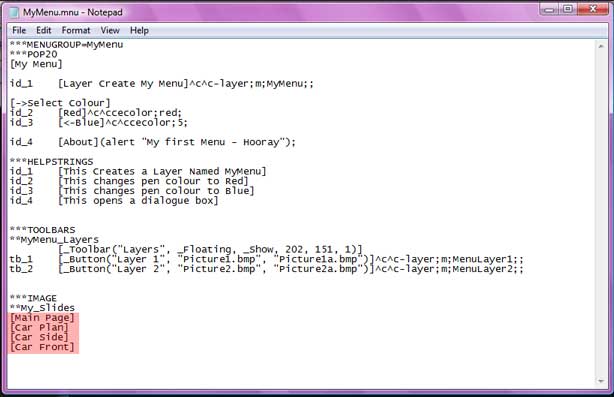
Fig.14
The first highlighted line [Main Page] is what will display in the slide library title menu. In (Fig.11) at the top of this page, you will notice the titlebar displays Block Library. To make this say Block Library, this would have been written exactly in the same place as where we have written [Main Page]. So when we load our library later, this is what will be displayed.
The next 3 lines are what will display in the menu of the slide library window. If you look again at Fig.11, all the words on the left hand side of the screen are our menu. So our menu will have 3 menu instances called Car Plan, Car Side & Car Front - you can name these anything you want. Notice in all cases we have enclosed the words in brackets. You must do this for everything to work correctly.
At present our menu is pretty useless, it doesn't do anything more than show the menu, and at this stage, not even the slides we created earlier are shown. So let's add them.

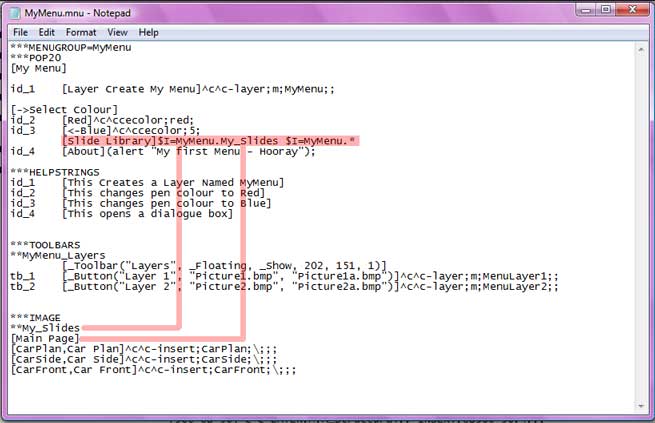
Fig.15
In Fig.15, notice the highlighted areas to the left of the screen. These are the names of our slides. Slides are always called before the menu name and are seperated by a comma. Notice we don't need to add the slide file extension on the end .sld.
So [CarPlan, Car Plan] first calls the slide (CarPlan), then the menu name Car Plan.
On the right hand side of the screen, we associate the menu name or slide with a command. You will notice this is the same format as all the previous commands we have used in the menu file. In these cases, we cancel any commands curently active ^c^c then call the block insert command using the no dialogue method (-) then tell AutoCAD which file we want to insert. Notice the \ - this is a pause and waits for user input. So the command works as follows:
cancel any current AutoCAD commans: ^c^c
call insert block command : -insert;
name block to insert: CarPlan;
pause for user to pick place to insert block: \
The next 3 lines are like pressing enter 3 times telling AutoCAD to skip x & y scaling and rotation. You could delete one of the ; from the end of the line and replace with another \ this would then pause for user to prick rotation of block.
OK, back to the slide library. Now we have a slide library but no way to access it - not very useful. Let's add a line to the main menu to invoke the slide library. Let's insert it before the About menu item.

Fig.16
I have inserted the code [Slide Library]$I=MyMenu.My_Slides $I=MyMenu.*
[Slide Library] is a simple menu item that will show on the main menu.
Next part is $I=MyMenu.My_Slides - The first bit is saying Call an image library that is called (something) $I=
In our case we are going to call our slide library My_Slides. The next part of the code after $I= says MyMenu. This is the actual name of the menugroup named on the very first line of our menu file. (i.e ***MENUGROUP=MyMenu)
We are telling AutoCAD to look in the menugroup called MyMenu and locate the image library called My_Slides.
The last part of the code we are saying call & search for any image file in the Menugroup My_Menu.
Load up AutoCAD and load the menu and you should have a menu like the one below Fig.17

Fig.17